
How to Set Up SX.org Proxies in Hidemium: A Step-by-Step Guide

You’ve created your proxy in SX.org and opened Hidemium. Now it’s time to connect it to a browser profile. Where should you paste the connection string, which protocol should you select and how do you check that the profile is using the right IP?
This guide takes you through the full setup: copying your connection details from SX.org, adding the proxy to Hidemium and launching your first profile. We’ll also cover importing multiple proxies at once and what to check if the connection fails.
Start with one profile to get familiar with the process, then follow the same steps for the rest.
Step 1. Prepare Your Proxy in SX.org
Open your SX.org dashboard and create a proxy connection with the settings your task requires.
Before creating the connection, check:
- Location: the country you want to connect through.
- IP mode: whether the IP address should stay the same or change.
- Additional network settings, if your workflow requires them.
If you already have a proxy, use its existing connection details. You do not need to create a new one just to add it to Hidemium.
Step 2. Copy Your Proxy in the Hidemium Format
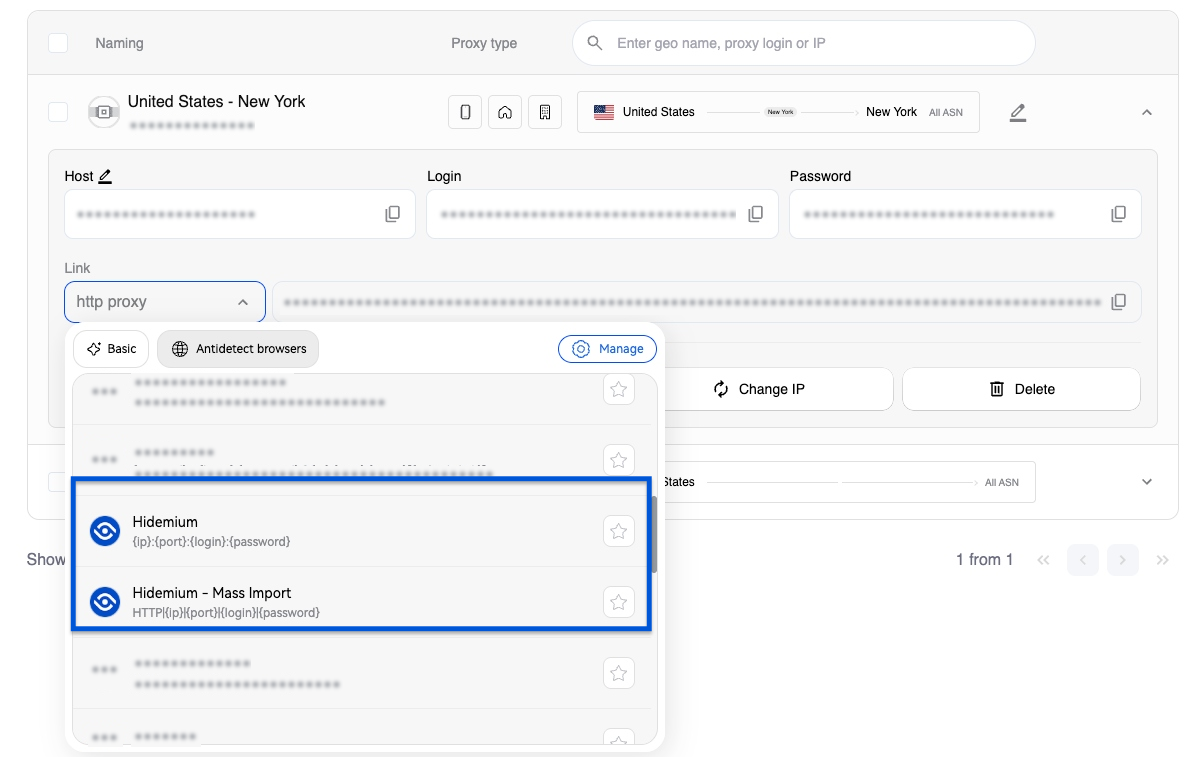
In your SX.org dashboard, select the Hidemium connection format. We prepared a proxy connection string that you can paste into the browser without copying each value separately.
Copy the entire string. It contains the details Hidemium will place in the individual connection fields: address, port, username and password.
Step 3. Paste the Connection String into Format Proxy
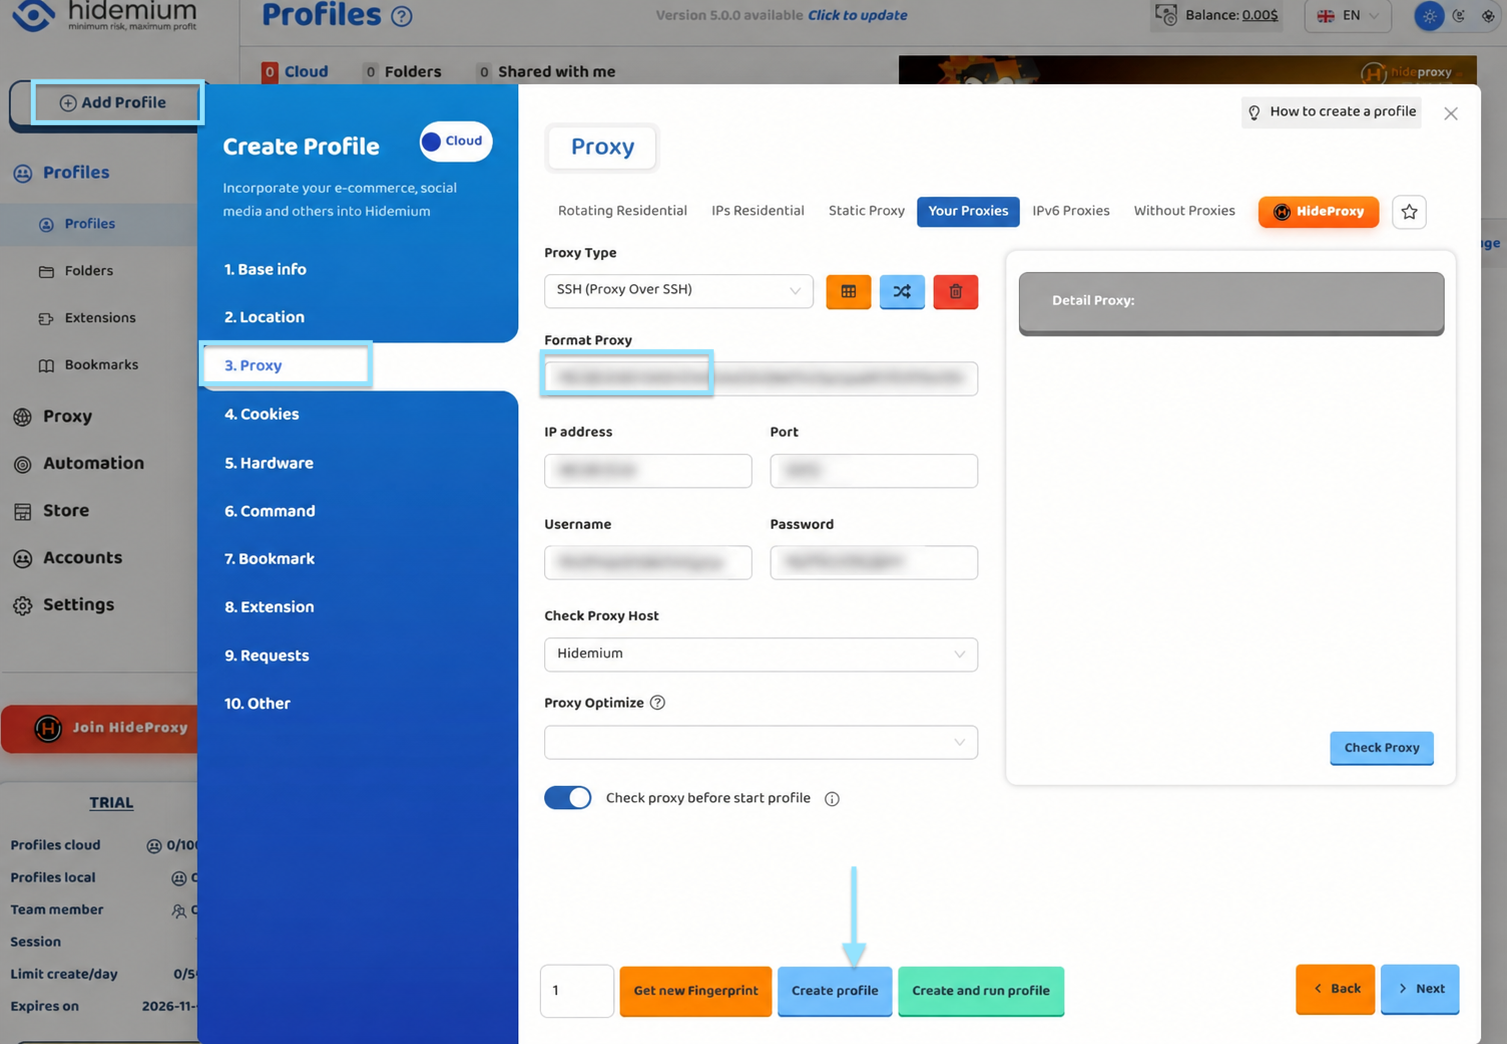
In the Proxy section:
- Select the protocol that matches your connection under Proxy Type.
- Find the Format Proxy field.
- Paste the connection string you copied.
- Review the automatically populated fields.
Hidemium will fill in IP address, Port, Username, and Password. Check that each value has been placed in the correct field.
Step 4. Test the Proxy Connection
Click Check Proxy before creating the profile.
This checks whether Hidemium can connect through the proxy using the details you entered. If the test succeeds, continue to save your profile.
If the test returns an error, check:
- Whether you copied the entire connection string.
- Whether the address and port are correct.
- Whether the username and password are correct.
- Whether Proxy Type matches the connection protocol.
A successful connection test is the first step. After launching the profile, check its external IP address and confirm that the websites you need work as expected.
Step 5. Create and Launch Your Profile
Complete any other profile settings your task requires.
Then choose one of the following:
- Create profile: save the profile without launching it immediately.
- Create and run profile: save and launch the profile.
If you choose Create profile, launch the saved profile from your Hidemium profile list.
Step 6. Verify the Connection Inside the Profile
Once the profile is running, open an external IP checking service inside that Hidemium profile—not in a separate browser.
Check:
- Which external IP address websites can see.
- Whether the detected country matches your selected location.
- Whether the pages you need load correctly.
- Whether you can complete your usual tasks.
Next, run a short working session. Open the websites you normally use, complete a few typical actions and upload a representative file if that is part of your workflow.
Loading one page is not enough to test your usual workload. If you plan to run several browser profiles at once, test that setup separately.
How to Import Multiple Proxies into Hidemium
You do not have to add every connection individually. We provide a Hidemium – Mass Import format and Hidemium supports bulk proxy imports.
To import multiple proxies:
- Prepare the connections you need in your SX.org dashboard.
- Select Hidemium – Mass Import.
- Copy the generated list.
- Open the proxy management section in Hidemium.
- Select the import option and paste your list.
- Check that each connection’s details have been recognized correctly.
- Assign the imported proxies to the appropriate profiles.
After importing, check both the proxy list and the profile assignments. Adding proxies to Hidemium and selecting a proxy for a particular profile are separate steps.
How to Manage Your Profiles After Setup
Check How IP Changes Are Controlled
If your task requires the same IP address, check the connection’s IP retention terms in advance. If you use IP rotation, make sure you understand what triggers an address change and when it happens.
Do not enable rotation simply because it is available. The connection settings should support your workflow rather than introduce unexpected changes.
Retest After Changing Connection Settings
If you change the proxy, protocol or authentication details, run Check Proxy again.
After launching the profile, recheck its external IP address before returning to your main task. This helps you catch configuration mistakes before starting a working session.
Troubleshooting: Proxy Not Working in Hidemium
Start with the connection details. Avoid changing multiple browser settings at once; first, confirm that the proxy information has been transferred correctly.
| Problem | What to check |
|---|---|
| Check Proxy returns an error | Make sure Proxy Type matches your connection protocol and that the address and port are correct. |
| Authentication fails | Use the proxy’s username and password, not your SX.org dashboard login details. |
| Fields are populated incorrectly after pasting | Check that you copied the full connection string and selected the Hidemium format in SX.org. |
| The connection still fails after correcting the details | Check whether the proxy is available and its connection details are current. Contact SX.org support for availability or authentication issues. |
| The external IP is different from what you expected | Make sure you are checking the IP inside the correct profile and confirm whether the connection uses IP rotation. |
Where to Get Help
Contact SX.org support for questions about the proxies themselves, including:
- Connection availability.
- Authentication.
- Proxy performance.
- Connection specifications and usage terms.
For help with profile creation, browser settings, or the Hidemium interface, use Hidemium’s documentation or contact its support team.
Hidemium Proxy Setup FAQ
Where Do I Enter a Proxy in Hidemium?
Open the profile creation window, go to the Proxy section, and paste your connection string into Format Proxy. The remaining fields will be filled in automatically. Review the details and selected protocol, then click Check Proxy.
Do I Need to Enter the IP Address, Port, Username and Password Separately?
Not when you use a prepared connection string in Format Proxy. Hidemium populates the individual fields for you. After pasting, check that each value appears in the correct field.
Which Proxy Type Should I Select?
Select the protocol specified for your proxy connection. The setting in Hidemium must match your proxy’s details, not the example shown in a screenshot.
Can I Import Multiple Proxies at Once?
Yes. Prepare your list using Hidemium – Mass Import in SX.org, import it through Hidemium’s proxy management section and then assign the connections to your profiles.
How Can I Check Whether a Hidemium Profile Is Using the Proxy?
Run Check Proxy, launch the profile, and open an external IP checking service inside it. Compare the result with your expected connection settings.
Do I Need a Separate Proxy Extension?
No separate proxy extension is required for the setup described in this guide. You enter the connection details directly in the Hidemium profile settings.